 Back to Home
Visual Graph Home
TriSun Software Inc. Home
 Visual Graph Site Menu
Home
What is Visual Graph?
Screenshots
50 Technical Features
Getting Started
Abundant Graphic Libraries
File Format
FAQ
Online Demo (IE Only)
Common Applications
 Visual Graph Getting Started
Use VG Component in Delphi 6
Use VG Component in VB6
Use Graphic Library
Change Element's Shape
Customize Property
Make Graphic Button
Get the Selected Elements
Dynamically Create Graph
Movable Label
Link Point
Access Properties
Use Line Vertexes
Call Windows API Functions
Call Visual Graph Functions
Callback Control Event in Script
Drag Graph in Run Mode
Detail Report
Make and Use Dialog Box
Visual Graph Getting Started - Use ActiveX Control in VB6
First, please make sure Visual Graph ActiveX control has been registered on your computer. If not, please run cmd.exe as administrator, and then use regsvr32.exe bin\vg.dll to register it.Now, let's start to use it in VB6.
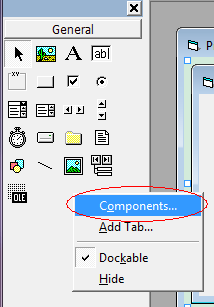
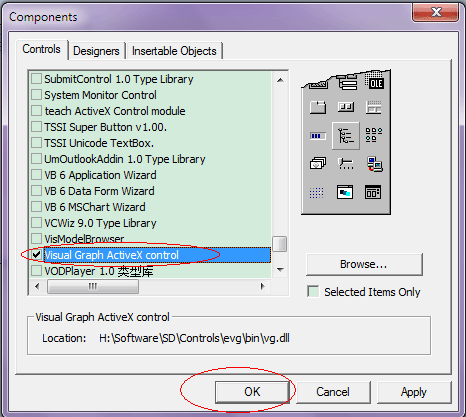
1. Create a new Standard EXE project in VB6, right-click on Toolbox and select Components, and then check Visual Graph ActiveX Control and click <OK>.


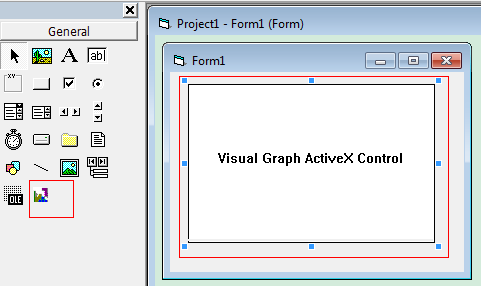
2. Click vgctrl in Toolbox, and then draw an instance on Form1, the default name of this vgctrl is vgctrl1.

3. Write the following code in Form_Load event:
vgctrl1.Design ""
It will begin to design a new Visual Graph document in vgctrl after executed above code. Visual Graph ActiveX control supports Design and Run modes (triggered by the corresponding function), no matter what you want to do with Visual Graph, you must call Design or Run function at first. Usually, in the drawing software, use Design mode to allow users drawing and editing the graphs; in industrial monitoring software, use Run mode to prevent users editing the graphs, but the graphs can respond to mouse or keyboard events still. If you want to Design/Run an existing Visual Graph file (.tbl), just use file's full path as the parameter for Design/Run function.
4. Place a CommandButton on Form1 and write the following code in Command1_Click event:
Dim ASheet As ISheet
Dim AShape As IUnit
Set ASheet = vgctrl1.vg.ActiveSheet
' AddUnit is a member function of Sheet class, below code will add a rectangle (accepts text) to current sheet.
Set AShape = ASheet.AddUnit(Nothing,"Rect")
' Set the rectangle's width and height to 100.
AShape.SetBounds 0, 0, 100, 100
' Text is a property of the basic graphic elements that used to change element's text.
AShape.Text = "Hello World!"
ActiveSheet is current sheet of the opened/designing .tbl file. Visual Graph supports multi-sheet in a file, and you will always draw graphs on ActiveSheet. For general applications, you only need ONE sheet, but if you use the .tbl file as a graphic library, it may contain multiple sheets.
Run this project and click Command1, now you can move or resize the rectangle by mouse, and can double-click this rectangle to input text.
5. Place another CommandButton on Form1, and then write the following code in Command2_Click event:
vgctrl1.vg.NewUnit Nothing, "Line"
NewUnit is a command function of Document class, run this project and click Command2, now you can draw a line by mouse.
6. Now, try to respond to mouse click event on vgctrl1 through the following code:
Private Sub vgctrl1_OnRButtonDown(ByVal X As Double, ByVal Y As Double)
Dim ASheet As ISheet
Dim AUnit As IUnit
Set ASheet = vgctrl1.vg.ActiveSheet
Set AUnit = ASheet.UnitAtPoint(X, Y, Nothing)
If Not AUnit Is Nothing Then MsgBox "You have right-clicked '" & AUnit.Name & "'."
End Sub
Run this project and click Command1 to generate a rectangle, and then right click on this rectangle, you will get a message box with the right-clicked graph name.
UnitAtPoint is a member function of Sheet class that returns the graph reference at special location. We usually use it to generate the different context menu according to the right-clicked graph object.
You can also simply use UnitAtCursor function to get the graph object at mouse pointer's location like this:
Set AUnit = ASheet.UnitAtCursor( Nothing )
7. Now we try to add elements to current sheet, place another Visual Graph ActiveX control (vgctrl2) on Form1 and set its Left = 10000, change Form_Load code as below:
vgctrl1.Design ""
' vgctrl1.DefaultPath is bin, that is, assign bin\controls.tbl to vgctrl2 and run it.
vgctrl2.Run vgctrl1.DefaultPath + "controls.tbl"
Now, place a CommandButton on Form1 again, write the following code in Command3_Click event:
vgctrl1.vg.NewUnit vgctrl2.vg, "button"
Above code will search the button element (in fact, it is the sheet name also) in bin\controls.tbl (related to vgctrl2), if found, the button element will be ready to use to draw on vgctrl1. In fact, you can use vgctrl to associate multiple .tbl files as elements library in your application. If you need to automatically add a button element from bin\controls.tbl, just change above code as
vgctrl1.vg.ActiveSheet.AddUnit vgctrl2.vg, "button"
8. Now we try to get/set the Caption property of Visual Graph button. Just paste the following code in the code editor:
Private Sub vgctrl1_OnDblClick()
Dim ASheet As ISheet
Dim AUnit As IUnit
Set ASheet = vgctrl1.vg.ActiveSheet
Set AUnit = ASheet.UnitAtCursor(Nothing)
If Not (AUnit Is Nothing) Then
' Use Type property to identify element type.
If AUnit.Type = "Button" Then
' GetPropertyValue is a member function of Unit class that used to get element property.
MsgBox AUnit.GetPropertyValue("Caption")
' SetPropertyValue is a member function of Unit class that used to set element property.
AUnit.SetPropertyValue "Caption", "Changed!"
MsgBox AUnit.GetPropertyValue("Caption")
End If
End If
End Sub
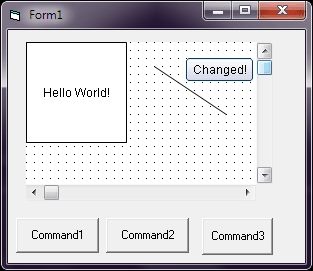
Run this project, click Command3 to draw a button, and then double-click this button to observe effect.
The final running interface might look like this:
